Ortho Project : Thermoforming (step 5)

Final challenge : the thermoforming ! Final, but definitively the part that was very long to adjust.

For that, I found dentist material (transparent thermoforming sheet 1mm) on internet, easily, for less than 0,4 euros each sheet.
This material was right, and 1 mm is enough (I tried 0,5 mm, but that’s too thick after thermoforming it)

This plastic sheet melt around 160°C, so I guessed that a heat gun was enough. WRONG !

First try and fail

Image 1 of 5

At first, a thought that a handgun with some aspiration will be enough

At this point, I needed to perfect my system.
Dentists are using specific machine for the thermoforming, you can find some cheap one on eBay around 150€ but I prefered to built mine.

I found an interesting video on YouTube (or this one), showing the process : heating (a lot) and then vacuuming. My mistake was to try do it at the same time.
So I designed a frame, and use my kitchen oven for the heating part.

Final design

Image 1 of 4

I created an aluminium frame to hold the dental plastic sheet, to heat it in my oven :)

This went really well, even if I had to perfect my system in the beginning. Timing of heating and good aspiration were important.
At the beginning, my success rate was below 30%, and at the end (few days later) I was above 80%.

Sometimes I used a bit the heat gun to complete the thermoforming, because my aspiration was not strong enough. It was for small adjustments, but not always a good idea with the PLA nearby.

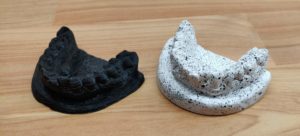
The last step was the cutting.

Ortho Project : Scan (step 2)

The 3D scan will be a real challenge : the goal is to get the best possible scan of my jaw, because at the end it will impact the movement of my teeth. At this scale, millimeter counts.

At first, I tried to look for “fab lab” around Paris where I could eventually find a 3D scanner to use. Dead end, either the lab were definitively closed or there were too far from my house or work.

I found a company on internet, in Paris also, that realized 3D scan with professional scanner : the quote for my jaw was around 200€. No way ! I had to find something cheaper. (I was not even sure of the result at this time, and didn’t want to engage to many money)

Finally, parsing the infinite internet, I found solutions to do it myself. Why not, I really enjoy do things only by myself !
I discovered the photogrammetry : a technique that transforms multiples images of an object into a 3d object. Nice, that’s what I need !
First I tried mobile app on my phone, but the result was quite cheap : a smartphone cannot process so many data.
But then, I found Meshroom ! #holygraal

Meshroom is an open source photogrammetry software, almost usable by everyone.

The first tries I did were not very conclusive, but I look for advices to improve the scan, and some French guys on Youtube give me the perfect trick : dots !
As Meshroom will try to match different pictures from my model, I needed to help him with points that it can identify and recognize.
It works like a charm (after 2 hours of compute, with a hundred picture), and I get a very nice 3d model with only my smartphone as a camera and a computer !

Awesome model, with no disturbances

My 3D model is there, the first challenge is a success !

Next step, the manipulation of the 3D model.

Ortho Project : 3D printing (step 4)

That’s the easy part, with no real challenge, as I already own a 3D printer (gift from my previous colleagues, on my wife’s precious advice. I love you !)
I’ve got a DiscoEasy 200, from Dagoma (a french company) : it’s a nice 3D printer to begin with, itself partly printed.

With my 3D model ready, I “just” had to export it in STL format, in order to print it.
Yeah “just”.. I had forgot a basic universal rule !

A thing I completely forgot since the beginning, is that “size does matter” !

After the creation of my first aligner and its try for a few hours, I realized that something was wrong (as it was quite painful !) The 3D scan was one thing, but there was a challenge to modelize my jaw at the exact same size. My first 3D model was not precise enough, and had less than 1mm wrong in size.

So I had to resize it precisely, with 2 iterations of resizing-printing-trying. I measure the final 3D print a caliper on multiples points, and also try it with my upper jaw.

About the 3D printing, I used :

      • Slic3r, an open-source slicer for converting my 3D model into a printable file.
      • PLA material
      • 0,2 mm nozzle (for the 3D printer)
      • Infill 10% (a 3D printing parameter to have a solid core)

Each print is about 1 hour, and use around 8 gr of PLA.

Next step (and final ?), the aligner’s thermoforming !