
That’s the easy part, with no real challenge, as I already own a 3D printer (gift from my previous colleagues, on my wife’s precious advice. I love you !)
I’ve got a DiscoEasy 200, from Dagoma (a french company) : it’s a nice 3D printer to begin with, itself partly printed.
With my 3D model ready, I “just” had to export it in STL format, in order to print it.
Yeah “just”.. I had forgot a basic universal rule !
A thing I completely forgot since the beginning, is that “size does matter” !
After the creation of my first aligner and its try for a few hours, I realized that something was wrong (as it was quite painful !) The 3D scan was one thing, but there was a challenge to modelize my jaw at the exact same size. My first 3D model was not precise enough, and had less than 1mm wrong in size.
So I had to resize it precisely, with 2 iterations of resizing-printing-trying. I measure the final 3D print a caliper on multiples points, and also try it with my upper jaw.
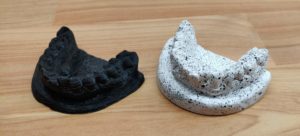
About the 3D printing, I used :
-
-
- Slic3r, an open-source slicer for converting my 3D model into a printable file.
- PLA material
- 0,2 mm nozzle (for the 3D printer)
- Infill 10% (a 3D printing parameter to have a solid core)
-
Each print is about 1 hour, and use around 8 gr of PLA.
Next step (and final ?), the aligner’s thermoforming !